2025 Audi Q6 rear view mirror housing removal and dash camera mount
Hi, I’m Ben from Safe Drive Solutions — Dash Cam Specialists. In this guide I’ll walk you through removing the unique rear view mirror housing on the brand new 2025 Audi Q6 and mounting a Viofo dash camera so the wiring is hidden and the camera sits out of the driver’s view. This is a straightforward job if you take your time and know where the clips and notches are.
Quick overview — what we’ll cover
- How the Audi Q6 rear view mirror housing comes apart (watch for the small notches and clips).
- Running the dash camera cable into the headliner and hiding it neatly.
- Reinstalling the housing and mounting the Viofo A329S dash camera on the windshield.
- Final tips: cleaning the glass, proper power connection, and securing the 3M adhesive.
Tools & supplies you’ll need
- Plastic trim removal tool or fingernails — be gentle to avoid scratching.
- Antiseptic or isopropyl wipes and paper towel for cleaning the windshield.
- Dash camera (we used the Viofo A329S in this install).
- Power cable and any GPS antenna fitted to the camera.
- 3M adhesive (comes on most dash cams) — you’ll want firm, clean contact.
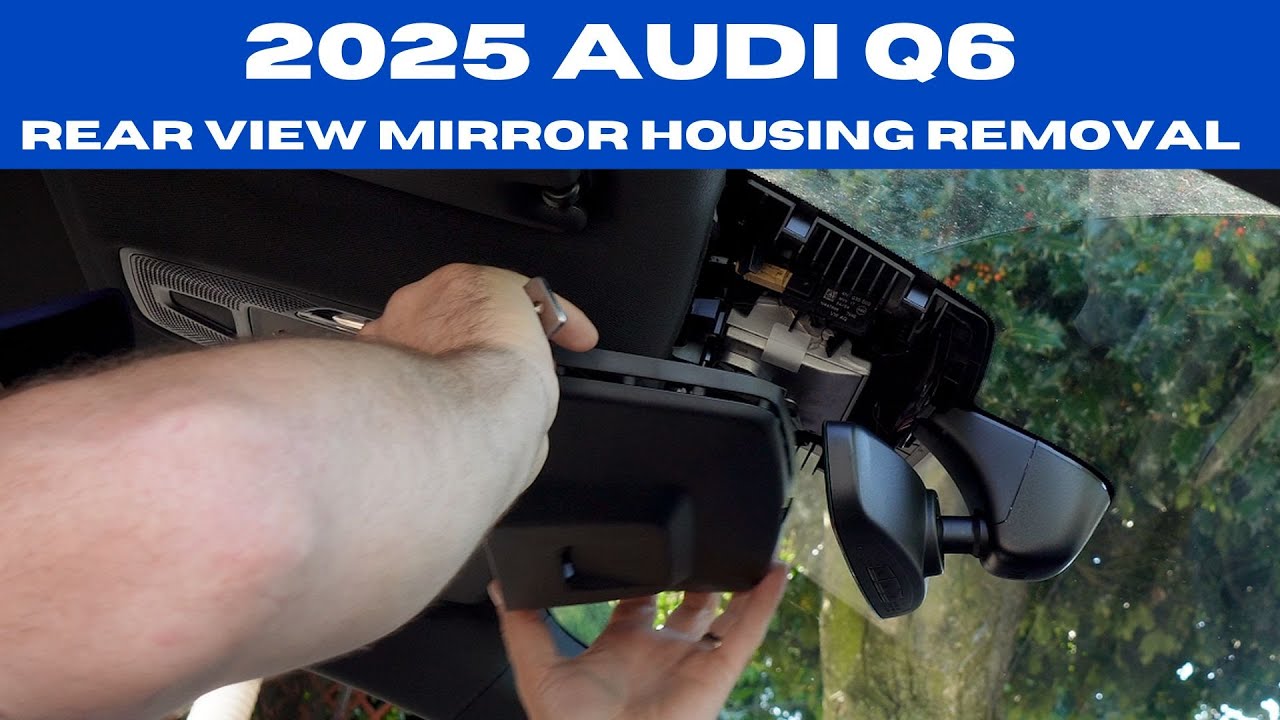
Step 1 — locate the notches and begin removal (be careful)
The Audi Q6 uses a slightly different housing behind the rear view mirror compared to other Audi models we’ve worked on. There are small notches on the plastic housing that you’ll need to disengage first. I usually start on the far side and work my way around.
Gently pry the notches outward. They pop off if you apply even pressure — remember to be patient and avoid forcing the plastic. Once the notches are free, there are two clips up top similar to other Audis (we’ve shown this procedure on Q7s before). Pull the panel away from the windshield to free the clips.
Step 2 — show the clips, free the housing and run the cable
With the housing loosened, you’ll see the small clips holding the panel to the headliner/windshield area. Carefully separate the panel from the windshield so you can run your dash camera cable up into the headliner. This is the easiest point to hide the cable so it looks factory-installed.
Run the cable high and tuck it into the headliner channel. Tucking the cable at this stage avoids any loose wires showing down the A-pillar and keeps everything neat. This also reduces the chance of the cable interfering with airbags or driver visibility.
Tip — what’s behind the housing
That connector and module-looking piece next to the mirror is part of the lane departure / lane assist system. Don’t disconnect or tamper with it — just work around it and keep the dash cam wiring separate.
Step 3 — reinstall the housing
After the cable is tucked into the headliner, slide the rear view mirror housing back into position. Line up the clips and press the panel until you hear the clips engage. It should sit flush and look like it did before.
Step 4 — choose the dash cam location and clean the glass
I mount the camera just beside the rear view mirror housing so it stays out of the driver’s view yet maintains a clean, centered perspective for the road. Before sticking the camera, clean the area with antiseptic/isopropyl wipes and a paper towel so the 3M tape has great adhesion.
Step 5 — plug power into the GPS antenna port (important)
Make sure the dash cam’s power cable is inserted into the correct port — on the Viofo A329S we installed, the power cord plugs into the top GPS antenna port. This placement is important for proper GPS reception and layout of the cable.
Step 6 — stick the camera and press the 3M adhesive firmly
Remove the 3M backing (I like to remove the GPS antenna first so I can push the camera straight into place). Stick the camera to the windshield and apply steady pressure so the tape bonds fully. That’s the part where patience is key — make sure there’s no dust or oils interfering with the adhesive contact.
Final check — tuck wires and confirm operation
With the housing clipped back in and the camera mounted, check the wiring path visually: everything should be tucked behind the housing and headliner with just the power lead showing down the A-pillar toward the fuse box or power source. Turn the car on and confirm the dash cam powers up (you should see “recording one channel started” or equivalent on the screen or LED).
Common pitfalls & safety notes
- Do not force clips or pry with metal tools — use plastic trim tools or your hands to avoid damage.
- Avoid touching the adhesive surface with fingers; oils reduce adhesion.
- Do not unplug or manipulate safety systems (lane assist, camera modules) behind the housing.
- If you’re unsure about hardwiring the camera to constant power, consider professional installation to protect your car battery and electrical system.
Want us to install it for you?
If you’d rather have a professional handle the removal, wiring, and hardwire setup, Safe Drive Solutions offers mobile dash cam installation in Vancouver and Toronto — we come to you and hide the wiring for a clean, factory look. Get a quote or learn more:
Dash cam installation: https://safedrivesolutions.com/pages/dash-cam-installation
Book a quote: https://safedrivesolutions.com/pages/dash-cam-quote
Useful resources and related products
- Viofo A329 product page (same model used here): https://safedrivesolutions.com/products/viofo-a329-2ch-first-4k-60fps-front-and-2k-rear3
- Shop dash cams and accessories: https://safedrivesolutions.com/collections/shop-dash-cam
- Learn more about dash cams and installation best practices: https://safedrivesolutions.com/pages/learn-more
- Viofo & support pages: https://safedrivesolutions.com/pages/support-viofo
- Why you need a dash cam (blog): https://safedrivesolutions.com/blogs/resources/why-you-need-a-dash-cam
- Dashcam wiring and airbag safety (install tip): https://safedrivesolutions.com/blogs/resources/dashcam-wiring-by-airbags-in-a-vehicle
Conclusion
Removing the Audi Q6 rear view mirror housing and mounting a dash camera is a tidy job when you understand where the notches and clips are and take time to tuck the cable into the headliner. The steps are simple: carefully remove the housing, run and hide the cable, reclip the housing, clean the glass, and stick the camera in place — making sure the power cable is in the correct GPS port. If you prefer a no-hassle, professional install, reach out — we install across Greater Vancouver and Greater Toronto and can hardwire your dash cam safely.
For general questions, installations, or to shop dash cams and accessories visit: https://safedrivesolutions.com/

